 Get Started midas Civil
 Featured blog of this week

How to Manually Define Construction Stages
Table of Contents
1. Construction Stages in midas Civil
2. Definition of Construction Stages in midas Civil
3. Construction Stage for Composite Section
1. Construction Stages in midas Civil
Construction Stage Analysis is a unique and useful feature of midas Civil since you can analyze all the construction stages that you define in just one model, and the results for each are all accumulated. This will lessen the failure of the structure during the construction stage since the evolving configurations and time-dependent displacements (creep & shrinkage) are also taken into consideration in analysis and design.
In midas Civil, Construction Stages are automatically considered once you used some of the wizards available in the software for your structural model but learning how to define construction stages manually will also come in handy, especially when you model a structure without using the available wizards.
In this article, the step-by-step guide on how to define Construction Stages on your own will be discussed.
2. Definition of Construction Stages in midas Civil
Before anything else, you first need to consider something on your model, the ‘Group’.
To effectively define your construction stages, you need to create groups for your Structural Members, Boundary Conditions, Loadings, and Tendons with the consideration of their launching stages. Basically, you will group together components of your model if they are going to be activated/deactivated at the same construction stage. You may create these groupings in your Group Tree Menu.
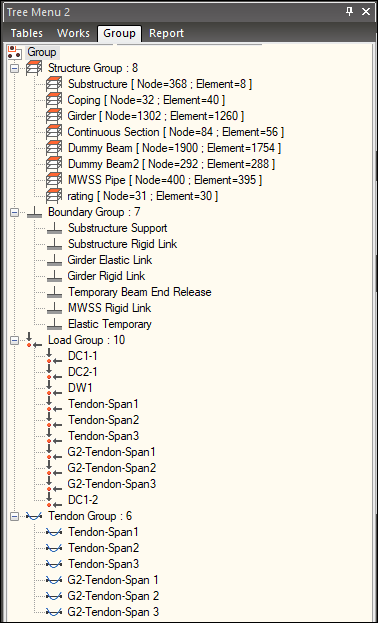
If you draw your model by importing from AutoCAD, Structural Groups are automatically created by adapting the different layers from your AutoCAD drawing. You may read the article “How to Utilize AutoCAD in Geometry Modeling in Midas Civil”.
Once all the groupings are set for your model, you can now start defining each construction stage. You have 2 options to access the Define Construction Stage window in midas Civil:
a. Load Tab > Construction Stage > Define C.S.
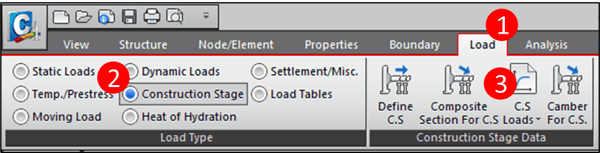 Figure 2.2 Define CS: Load Tab
b. You can also access the same window by clicking the Define Construction Stage function at the upper right of your model window:
 Figure 2.3 Define CS: Model Window
Define Construction Stage Window looks like this:
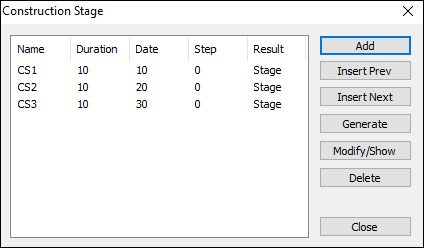 Figure 2.4 Construction Stage window
This window will look empty if you haven’t defined any construction stage yet. Then to start defining your construction stage, just click add, then the Compose Construction Stage window will pop-up, where you can chronologically define the construction stages that you want to consider.
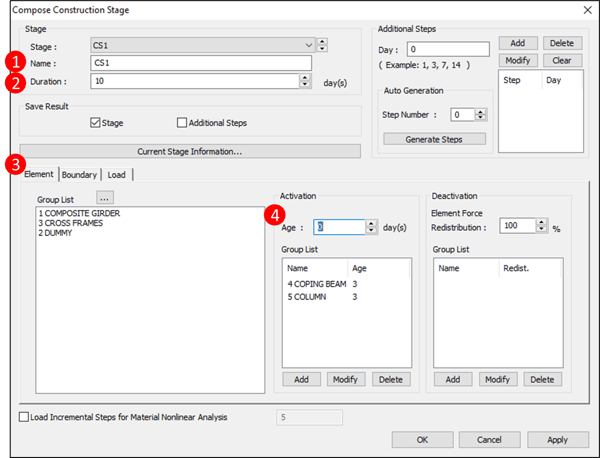
1. Name – Input your desired name for this specific construction stage. It is highly suggested to have a uniform naming convention for easier navigation.
2. Duration – Define the number of days for the completion of your construction stage.
3. Element Tab – All the Groups defined in your Structural group will show here. Select the specific group that will be launched/removed on this construction stage, then click ‘Add’ in the ‘Activation’/’Deactivation’ respectively.
4. Age – Input the concrete age of each structural group before acting as a structural member.
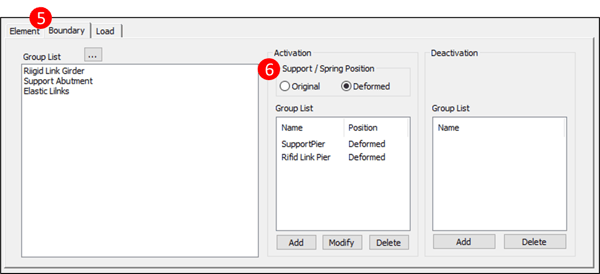
5. Boundary Tab – all the Boundary Groups defined on your Group Tree Menu will show here. Select the specific group that will be launched/removed on this construction stage, then click ‘Add’ in the ‘Activation’/’Deactivation’ respectively.
6. Support/Spring Position – select if the boundary condition will consider Original (undeformed, no displacement force is imposed to the boundary condition) or Deformed (displacement force is imposed to the boundary condition).
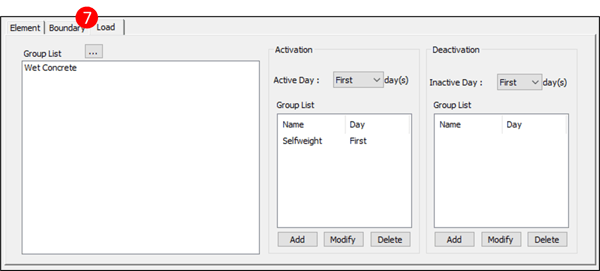
7. Load Tab - all the Load and Tendon Groups defined on your Group Tree Menu will show here. Select the specific group that will be launched/removed on this construction stage, then click ‘Add’ in the ‘Activation’/’Deactivation’ respectively.
Then once everything is set for that specific construction stage, just click ‘Apply’, then keep on doing the same process for the next construction stages until you defined the last one.
Just take note that no need to redefine activation of previously activated groups since they are already activated on the next construction stage automatically.
3. Construction Stage for Composite Section
For composite sections, the girders are launched first, then the slab is launched on a different construction stage. So, you need to define this difference in launching time using the ‘Composite Section for CS’ (Load Tab > Construction Stage > Composite Section for CS).
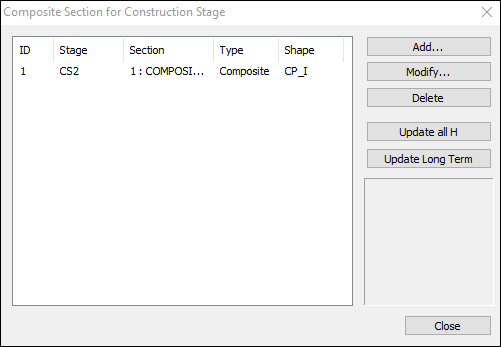 Figure 3.1 Construction Stage for CS
This will be empty if you haven’t defined anything yet. To start defining, just click ‘Add’.
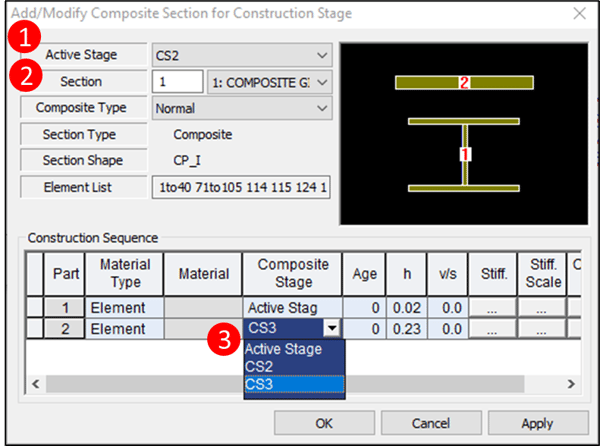 Figure 3.2 Add Composite Section for Construction Stages
1. Select the Construction Stage where a composite section is launched.
2. Select the composite section that is launched on this construction stage.
3. On part number 2 (for the slab), change the ‘Composite Stage’ to the construction stage where you want your slab to be activated.
Just click ‘Apply’, then your composite section is now set.
Your construction stages are now set, then you can now view each of these stages individually using the dropdown beside the ‘Define Construction Stage’ at the upper right of the model window. You may notice that your ‘Works Tree Menu’ will also change based on the active construction stage on your model.
Do take note also that you cannot do any modification to your model while you are in any construction stage. Go back to the ‘Base’ stage if you want to do some modification.
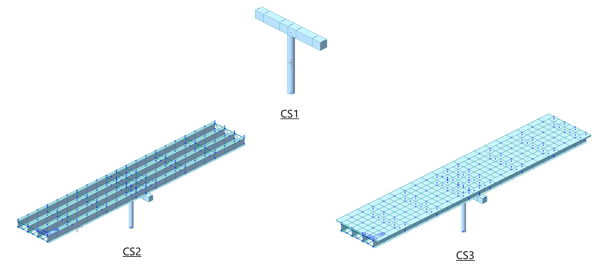 Figure 3.3 Simple Construction Stage example
Please take note that this is just a simple example to illustrate how to apply construction stages to your model. You may use this as a reference to define construction stages on your projects in anyway applicable.


/2020%20Pics%20for%20drafts/Moving%20Load%20All%20You%20Need%20to%20Know-1.jpeg)
/MC%2004%20Section/How%20to%20Define%20Section%20Properties%20in%20Various%20Bridge%20Design%20Conditions%20345%20240.png)
/345%20240/Application%20of%20Links%20in%20Bridge%20FE%20Models.png)